September Phenomenon: Fairy Rings
September Puzzling Phenomenon: Fairy Ring
Developed by Sarah Lamphier, September 2016
Concept
Ecosystem interactions and/or symbiosis
Introduction & Phenomenon
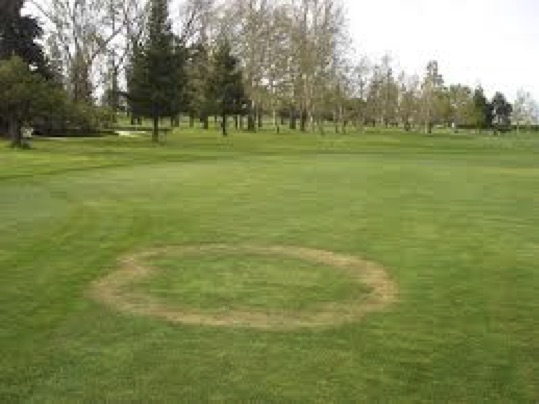
I had been stuck inside for a solid two days due to record-breaking rains and local flooding. When the rain stopped and I finally ventured out, I observed something perplexing in two separate yards in my neighborhood:
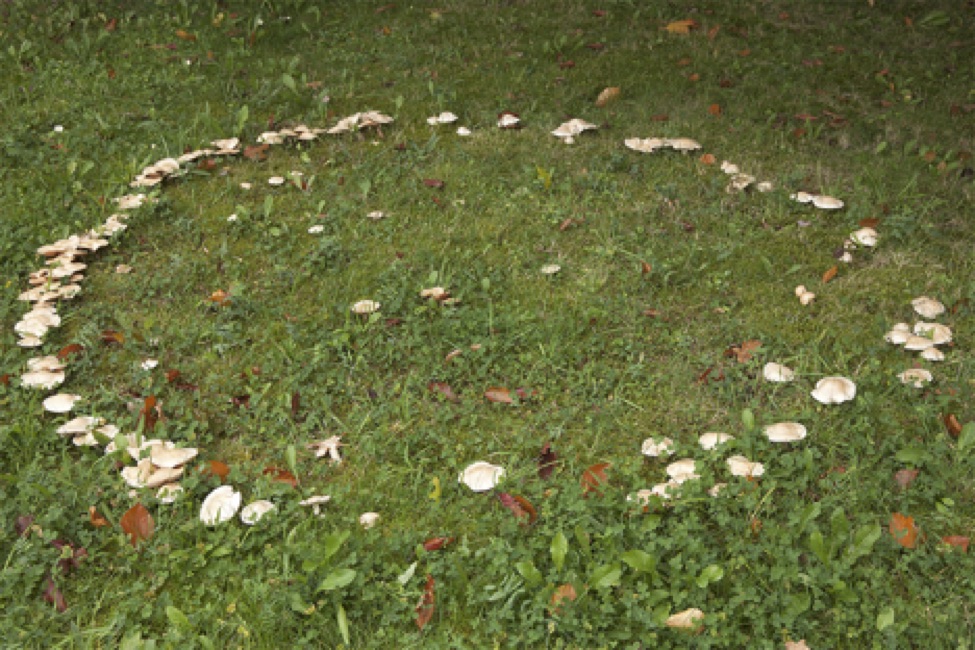
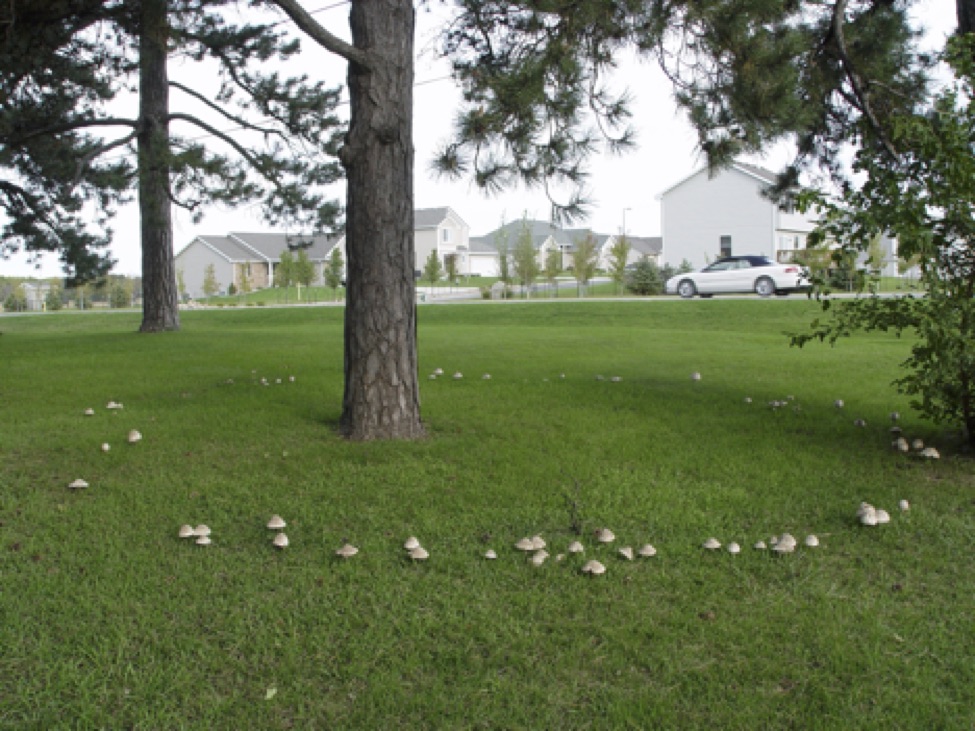
What could possibly cause mushrooms to grow in this neatly formed circle? One of the
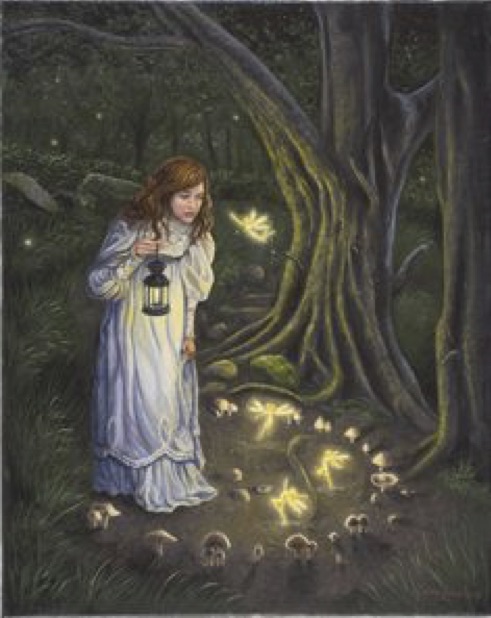
neighbors was out walking her dog, and I asked her about the strange ring of mushrooms in her yard—she said the lawn was clear the day before, that they popped up overnight, and she did not “plant” anything there on purpose. In fact, she suspected that the ring had been left behind by fairies who had danced in a circle in her yard during the night. I nearly laughed out loud, but she insisted and explained that she had a family heirloom painting of this phenomenon hanging in her house:
Do you buy her fairy explanation? If not, what do you think caused these rings of mushrooms?
Explanation of Science Involved
Fairy rings are formed by certain varieties of fungus that flourish in wet, rainy conditions. The body of the fungus (called the mycelium) lives underground, and it grows outward in a circle in search of more and more nutrients. The mushrooms spring up from the edge of the mycelium, especially in wet weather, and therefore form a ring. The organism itself is actually a full circle, which is not at all a curious shape for an organism—but it appears as a ring because the only visible part is the perimeter that shoots up mushrooms above ground.
Additionally, fairy rings that form under the canopy of a tree and appear to neatly circle a tree trunk are typically evidence of a symbiotic relationship between mycorrhizal fungi that partner with tree roots (mutualism). The tree roots gain fixed nitrogen from the mycelium of the fungi and the fungi depend on the tree roots for structure and space for growth.
Other, less dramatic and more common instances of this same organismal interaction with the environment are circles of differently colored grass in a lawn—deep green at first, then dry and brown. As the fungus grows, it breaks down the dead organic material beneath the grass, which at first acts like a fertilizer and enables the grass to grow more richly than the rest of the lawn. But then the fungi uses up all of the organic material for its own growth, and in its absence, the grass at the perimeter of the mycelium dies for lack of nutrients.
Further ideas for classroom use
-Could be used to begin a unit on ecosystem interactions. After establishing context and showing the photos (fairy part obviously optional!), students could draw explanatory models of what they think is causing the growth of mushrooms in a ring. If used as a full-blown modeling exercise like we did with the broken wine glass during the summer, some gotta-haves for the later model iterations could include:
1. What exists beneath the grass to support fungi growth in this location?
2. What role does the rainy weather play, if any?
3. How are the mushrooms interacting with the tree (in the 2nd photo)?
4. (After showing non-mushroom circle photos, perhaps later in the unit), why does the grass first turn a rich green, followed by brown?
-Later in a unit on ecosystems, you could use just the tree photo and grass ring photos as a way to introduce symbiosis. After providing some basic information about what’s going on beneath the surface, possibly even showing or drawing a picture of the mycelium and tree roots, some key questions to elicit student thinking and help with sensemaking could include:
1. How are the mushrooms interacting with the tree?
2. What might the mushrooms “get” from the tree root system?
3. What might the tree roots “get” from the fungus?
4. Which organisms benefit from this interaction?
5. How does this interaction compare to _______? (Bring in another symbiotic interaction, but one that is parasitism or commensalism, such as ticks and deer or barnacles and whales.)
Download this resource as a Word Document here.
November Phenomenon: A Curious Case of Puppies
November Puzzling Phenomenon:
Developed by Nicole Gerardo, November 2016
Title: A Curious Case of Puppies
Concept: Heredity/Genetics (dominant/recessive alleles, monohybrid cross, di-hybrid cross)
Introduction and Phenomenon:
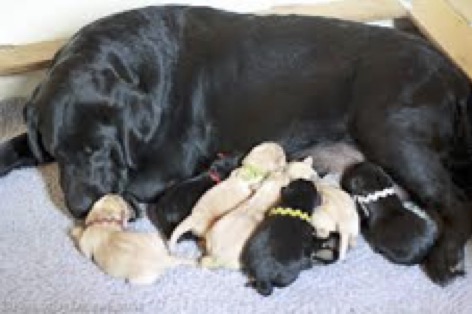
Some friends of ours just welcomed a brand new litter of Labrador puppies similar to the ones seen in photo below. Who doesn’t love going to see some brand new adorable puppies? Of course we had to go for a visit! I knew from past experience being educated by a sister in love with dogs of all breeds, that Labradors came in three colors: black, chocolate, and yellow. I did find it a bit curious to see that some of the puppies nestled in with the mother were of a different color than she was. Most were black labs like mom, but there were some that were yellow as well. So what would a logical explanation be for some puppies that look nothing like mom?
Well dad must have been a yellow lab, right?
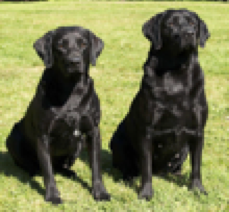
Come to find out, I was quite wrong. I later learned that the daddy dog was also a black lab!
This had me a bit stumped and quite curious to uncover more about what lies hidden in the genes of Labrador dogs.
Explanation of the science involved:
It turns out that the genes behind the coat color of Labrador retrievers provide quite a few opportunities to explore different levels of concepts important to the topic of genetics.
At the most basic level, surprising litters of Labrador puppies can be used to help students understand the difference between dominant and recessive genes. Certain Labrador coat colors can be “masked” in some generations, but can reappear in later generations. Students may be able to generalize that yellow and also chocolate coat colors have a recessive nature after examining multiple examples of litters. But how can there be two colors that would be recessive?! The explanation becomes quite interesting when you look at the actual genotypes of the labs in question.
The next level would be to use Labrador coat color to help students understand the possibilities of offspring in a monohybrid cross. In the case of Labradors, the black and chocolate colors are determined by dominant and recessive alleles at one gene locus. The black coat color (B) is dominant to chocolate (b). Therefore, a puppy will only be chocolate if each parent contributes a chocolate allele (b) giving the puppy a genotype of “bb”. If one or both parents contribute a black allele (B), the puppy will be black in color, with a genotype of “BB” or “Bb.” It will be a carrier of the chocolate allele for future generations if the pup has the heterozygous genotype “Bb”.
Here is just one example of a monohybrid cross showing the relationship between black and chocolate lab coat colors.
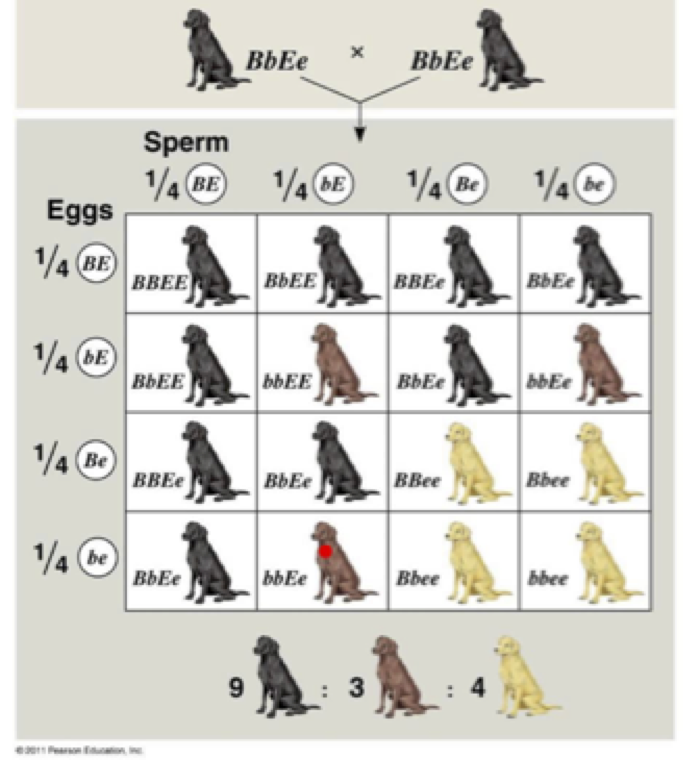
Now you might still be wondering where the yellow coat color comes into play. The explanation behind the third coat color allows for an even deeper look into the complex nature of genetics. The gene that determines if a Labrador puppy will be yellow or not is actually at a different location (gene locus) than the gene that influences the black and chocolate coat colors. This second gene locus can carry a dominant allele (Y) or a recessive allele (y). In order to have a yellow coat, a Labrador must inherit two recessive copies of the yellow allele to have the homozygous genotype “yy”. This genotype inactivates the black or brown genes, and the resulting puppy has a yellow coat. However, if only one or no recessive alleles are contributed, as in the genotypes “Yy” or “YY,” the deactivation does not occur. The resulting puppy will remain either black or chocolate, as determined by the alleles of the puppy’s black/chocolate gene. Considering the genotypes of black, chocolate, and yellow labs allows for the study of the resulting offspring in dihybrid crosses.
Here is an example below of a dihybrid cross that shows how two black Labradors can actually produce offspring of all three coat colors.

Further Ideas for Classroom Use:
A: This puzzling phenomenon could be used to begin a unit about Heredity/Genetics. By showing a picture of a puppy litter with only one parent dog present, students could be asked to develop hypotheses for why the puppies look the way they do.
Potential Questions after the first picture
- What do you observe about the dogs in the picture?
- What is a possible explanation for your observations?
After sharing their ideas, students can then be given the additional information that both parents are black labs.
Potential Questions after new parent information
- Has this new information changed your initial thinking? Why or why not?
- What new explanation can account for both parent dogs and the puppies you
observe in the pictures?
- Can you think of a similar situation from your own life or from someone close to you?
What was the explanation in this situation?
Along with these last questions, student groups could be asked to create explanatory models of how the different looking puppies came about. By the end of the unit, these are some gotta-haves that students should be able to include in the final examples of their models:
1. What can be observed about the dogs? Describe their relationships.
(Students should be able to identify generations of organisms and phenotypes.)
2. What information is hidden within the dogs that affects their appearance?
(Students should be able to predict possible genotypes of organisms and understand that this information lies in the genes of the organism’s chromosomes.)
3. What interactions occur with the parent information in order to produce the puppies
that are observed?
(Students should be able to describe the interactions between dominant and
recessive alleles and predict the outcomes of these interactions.)
B: This phenomenon could also be used later on in a unit on Heredity/Genetics to help provide options for differentiation of student work with Punnett Squares. If students need more practice with monohybrid crosses, they could work on making predictions about the offspring of only chocolate and black Labrador parents with varying genotypes. Students could also work up to the challenge of being able to figure out an unknown parent genotype by trying to puzzle out the method that we know as a test cross.
If students have mastered the use of basic Punnett Squares, they could be given the additional challenge of making predictions of dihybrid crosses between black, chocolate, or yellow lab parents with varying genotypes. In this case, there are enough options of genotypes that students could even make up their own crosses and see what offspring would be predicted.
Later in the unit, students could also be given a real-life challenge as if they were in the role of a dog breeder. Here is an example scenario:
“You get to choose what color coat you believe best suits Labrador retrievers! Once you have chosen which coat color you prefer, please explain how over the course of at least 3 generations you could maximize the number of puppies born with your favorite coat color.”
Download this month's phenonemon as a Word Document here.